I make it a habit to fix as many ball marks that I find when I'm on the green. I really appreciate it when others do the same. However, I can't tell you how many times I see golfers fix ball marks incorrectly. More times than not, I'll see a well-intentioned golfer plunge his ballmark repair tool behind the ball mark and then pry it upward like he's trying to uproot a weed. I cringe because I know that such action only worsens the damage done to the green, prolonging the healing process. If done correctly, fixing a ball mark will start the healing process immediately, rather than weeks later.
Here's the correct way to fix a ball mark:
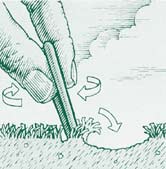
- Use a ballmark repair tool to do the job most efficiently.

- Insert the repair tool at the edge of the high side of the ball mark.
- Push the tool forward from the edge of the ball mark toward the center. Do this around the edges of the indentation.
- Do NOT insert the tool under the indented area and push up - a common mistake. Think of it as pushing turf in from the edges toward the center.
- Tap down the repaired area.
Here is a good vidoe demonstrating proper ball mark repair technique:
GCSAA
Together, we can make golf a little less grouchy.
Tidak ada komentar:
Posting Komentar